This is the first of a series of articles covering the essential biomechanical lengths and strengths around the upper and lower leg muscles and joints required for running. This will allow you to simply assess your own running style and decide if you are at risk of overloading a particular area and injuring it. The self-help remedial work for all these areas will be discussed so you can start your own rehab.
The series will take in lower and upper leg strength and lower and upper leg lengths through joints and muscles.
These articles will help you to have a better understanding of why things hurt and some of the simple things you can do. It is not a substitute for a proper assessment from a Chartered Physiotherapist with a good understanding of the runner. If in doubt then seek further advice.
Lower Leg – Essential Strengths
Here are two simple lower leg strength tests and exercises that you can perform to see if you have the basic strengths required in two of the most important running muscles. At jogging at 12 minute mile pace each leg has to absorb 3 - 4 times body weight every step and there are around 2000 steps to a mile. This puts the tests below in context. You need to be strong!
Calf / Heel Rises
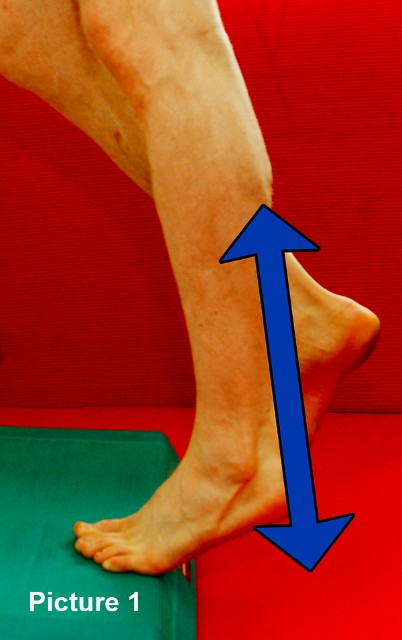
Test - For steady distance running work 3 x 25 single leg calf or heel rises off the edge of a step with around 20kg to 25kg on your back off a 2 min recovery is a good standard strength standard for a calf to see if there is an inherent weakness. (N.B. If you are not moving through the whole range then you are cheating! Many Achilles and foot issues present with weakness in the calf. Remedial work for this is to build up from the number of reps that you fail at to the 25 required, 3 sets in a row with a 2 min recovery. If you fail at 10 then that is where you start from. Do 3 sets of as many as you can to failure once a day and it will improve. (See Picture 1)
Foot turn in or inversion of the foot
There are important muscles (mostly Tibialis Posterior) that absorb the impact of the foot hitting the ground and control the tendency to roll in (pronation). If they allow too much rolling in or pronation then it affects the mechanics of the leg leading to inefficient running (slowness!) and possible injury.
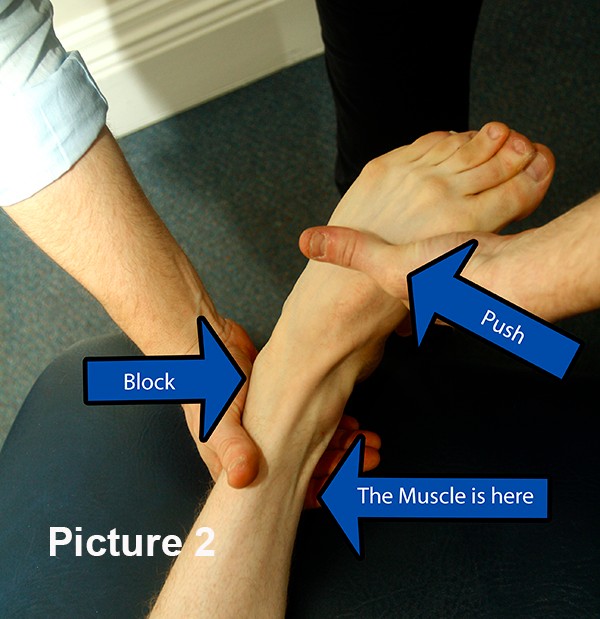
Test - You should be able to hold your foot against being pushed out by a partner. (You will need someone to do this for you). The foot should not be able to be pushed away from the starting position shown in Picture 2. If it can then it is weaker than it should be. (It does not matter how strong the person is – it should not move!)
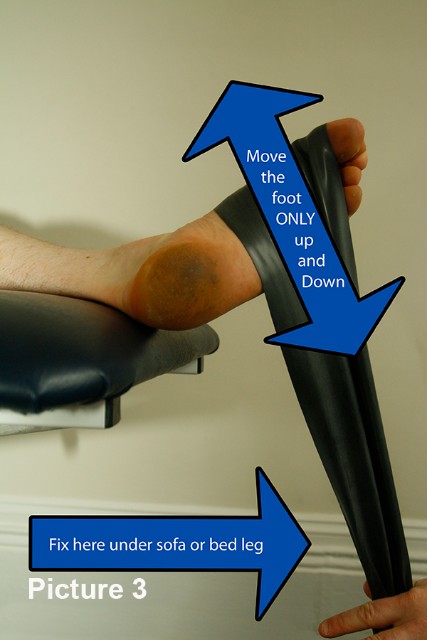
Remedial work – Lay on the bed or sofa on the side to be exercised and the foot over the end or arm. Turn foot up and in against an exercise band - 3 x 15 for very heavy theraband (black or purple or an old inner tube). It is only the foot that should move, not the whole leg. 3 x 15 should be manageable but tough. If you cannot repeat 15 reduce the tension; if it is easy then increase the tension.
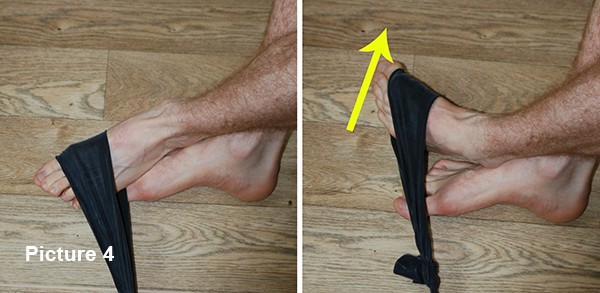
Alternatively sit with the band around your foot and the end attached to a radiator or shut in the door. Cross the foot you wish to work over the front of the other foot (as in Picture 4) and keep the knees still – maybe locked together. Turn the foot in against the band.
As you strengthen this muscle you can progress onto the pulley machine in the gym. If you do then you can put the weight up and lower the reps to provide pure strength. Say 8 reps, 5 sets, 3 times a week.
